Hello Beauties!
Today I have a super fun yet informative post on a company some of you may have heard of:
Jamberry Nails!
As you may or may not already know, I am a nail polish enthusiast and love painting my nails! I have a huge collection of nail polish, really loving experimenting with different colors, formulas, and brands, and love having my nails and toes looking fresh and polished on a regular basis. I also get complete satisfaction out of avoiding the crazy cost of nail salon visits by doing my own manicures and pedicures at home. It took some practice and patience but now, a couple years and a 120+ bottle polish collection later, there is no looking back to shelling out $20-30 every time I want my nails to look good. I also really enjoy taking the time out for myself to do my nails. Everyone needs some Me Time!
With all of that being said, there is one thing I am yet to experiment much with- nail art. I am not very good at even the simplest designs so glitter top coats or special effect polishes are about as artsy as my manicures get when I want something other than a plain color. Also, unless you pay EVEN MORE for shellac or gel manicures at a salon, polish usually chips in less than a week, sometimes even in just two or three days, depending on the brand, but especially if you are rough on your hands like me.
So, combine my love of all things nails, with the problems with conventional polish and a lack of nail art ability and it is easy to see what would attract me to a company called Jamberry Nails. Jamberry sells high end, long lasting, nail wraps through independent distributers. They have a traditional multi-level marketing system but don’t let that deter you. Nail wraps have been gaining popularity over the past year due to the convenience, lasting power, and ability to rock intricate designs without the work! However, all nail wraps are not created equally. There are several different brands and types on the market including those made out of real nail polish, such as Sally Hansen, and those that are made of a thin sticker material that require a top coat, like NCLA nail wraps. Jamberry nail wraps are made out of a thin vinyl material with a heat activated adhesive backing which binds the strip to your nail. They do not chip or smudge, since they are not made out of real polish, and do not require a top coat as they are already shiny. They have a TON of different designs ranging from solid colors, glitter effects, patterns with a clear background meant for layering, and every type of pattern under the sun ranging from floral to collegiate.
I came across Jamberry nails when my blogger friend Ashly invited me to her friend’s Jamberry Nails Facebook party. At first, I wasn’t sure it was something I would be interested in but after taking a look at the party info, I decided that it sounded like fun and that the nail wraps might be a pretty cool alternative to nail polish that I wouldn’t mind checking out! Also, not to mention that every guest gets a FREE sample wrap that is perfect for an accent nail on each hand! The party was actually really cool since the consultant posts games and puzzles that the guests can answer to earn points for prizes including free wraps! You also get points for placing an order, posting a picture of your sample, and other various tasks and it is super fun to learn about the application process and all of the design possibilities Jamberry offers.
I have been to two Jamberry Facebook parties, including the one I just mentioned and will be reviewing the items I ordered from each event as well as my first impression of the nail wraps, the application process, and my final review now that I have had a bit of practice applying these wraps! Read on for all things Jamberry and lots of pictures! 🙂
_________________________________________________
SAMPLES
Since I attended two separate Jamberry parties, I was able to get two different sample wraps, one from each party, that I used to create super cute accent nail manicures! Take a look:


^Sample #1 = “Flirty Flair” wrap on ring fingers paired with Essie’s Bikini so Teeny polish.
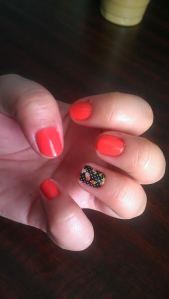

^Sample #2 = “Cup of Tea” wrap on ring fingers paired with L’Oreal Tangerine Crush polish.
SEE, how freaking adorable are those!?
_________________________________________________
PRODUCTS ORDERED
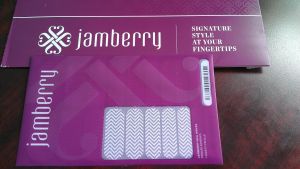


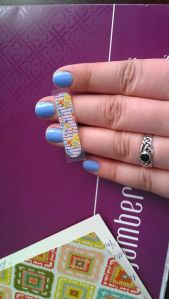
The top two pictures are of the “White Chevron” wraps I ordered from the first party. These are one of their clear wraps which means the design is printed on a clear backing. These are meant for layering over other Jamberry wraps like the solids and sparkles, or over traditional polish which I have done and will show you later in the post. I am OBSESSED with anything chevron so I knew these would be perfect for me 🙂 The price of one set of wraps is $15.00 plus tax and shipping. The total came to $20.13.
The bottom two pictures are of the entire “kit” I purchased at the second party. Although it is considered a party bundle or pack you must add all items to your cart separately. The “kit” includes the Jamberry mini heater, 4 wraps of your choice, and their manicure set with out without the cuticle oil. I got mine without because I already have some at home. The set with the cuticle oil is $8.00 more.
The manicure set includes two alcohol prep wipes, a metal nail clipper, a nail file, a rubber cuticle pusher, two wooden orange sticks, metal curved nail scissors, a 4 sided buffing block, and a zippered bag that holds everything including your nail wraps! The price of the kit without the cuticle oil including tax and shipping was $85.32.
I also want to mention that their wraps are always buy three get one free no matter when you order or what wraps you choose! The small set of wraps shown in the pictures above were included in my order for free in celebration of Jamberry’s million order milestone. I am not sure how long they will be giving those away.
The wraps I ordered in my second purchase are “Vintage Chic”- a pretty gold white and pink floral over a mint background, “Grey & White Polka”- a light grey background with white polka dots, “Turple Ombre”- teal/blue at the cuticle fading to purple at the tips, and “Navy Skinny”- a white background with thin navy horizontal stripes.
_________________________________________________
APPLICATION
There are many application tutorials and videos all over the internet describing different methods for applying Jamberry nail wraps but I will describe the steps I used to get the best results.
First, by using the clear background to help you estimate, choose which wrap you want to place on your nail, according to size. Push back your cuticles, lightly buff the surface of your nail, and prep your nail with polish remover or alcohol to remove any oils. Then, peel back about half of the wrap from the clear backing using a wooden orange stick to prevent touching the adhesive, then cut it. Usually one wrap will cover two nails unless they are very long. Once you have cut the length of wrap needed, hold it using the tip of the wooden orange stick and place it in front of a heat source for about 5 seconds. You can use a blow dryer but it is much easier to use a small heater such as the Jamberry heater that I mentioned before. You will see the wrap bend a bit once it gets soft from the heat.
Immediately after heating, carefully and lightly place the nail wrap onto your cleaned and prepped nail, with the rounded edge near your cuticle, trying to get it as straight as possible and making sure not to touch any skin whatsoever. Once you place it on your nail in the right position, use the rubber cuticle pusher to first smooth down the middle of the wrap, then back and forth on each side making sure there are no bumps, wrinkles, or bubbles, although those issues have never happened to me. Once the wrap is placed firmly down on the nail, smooth it over with your finger to make sure it is nicely adhered.
After you apply the wrap, you are going to have some excess hanging off the tip of the nail which will later be trimmed and filed once cooled and set. Before trimming and filing, this next step is what I did on my second application to ensure that I had no lifting at the tips of the nails (like I experienced the first time) and is referred to as the baggie method. Take your finger and nail and place it into a clear plastic baggie. Tightly wrap the side of the baggie around the tip of the nail, pulling down and around, creating a way to seal the excess wrap tightly around the tip. Then, apply a bit more heat using your available source and more pressure using your finger or rubber cuticle pusher. Take off the baggie and you will see that the wrap looks much, much, more securely adhered, and almost shrink wrapped, to the tip of the nail. (You can also use the baggie method combined with applying a microwaveable rice bag on top of your nail in place of the heater or blow dryer. I plan to make one and try that next time.)
Once you have applied all ten nail wraps, wait a few minutes, away from any heat, for the wraps to completely cool and set. This is super important! Once cooled, you will take care of the excess by trimming and then filing it off the tip of your nail. First, use nail clippers or small nail scissors to cut the excess wrap pretty closely to the tip of your nail leaving only a very tiny bit left on the edge. You will file the rest of this remaining wrap off. Keep in mind that you do not file from side to side like you would normally do! Instead, use a downward motion. So if you are looking at your nails, take the file point it towards you and file away from you using gentle short strokes until you see the excess wrap roll away. You can go back over your nails with a buffer to smooth any rough edges.
AND VOILA!
Now you can sit back and admire your hard work knowing that your perfect beautiful nails will last for up to TWO WHOLE WEEKS without chipping, smudging, looking dull, fading, peeling, or lifting. How amazing is that?
The application process is a bit intimidating at first, especially if you have never tried any type of nail wraps before, however, it is a quick learning process and the results are totally and completely worth it!
Check out pictures of my first two “Jamicures”

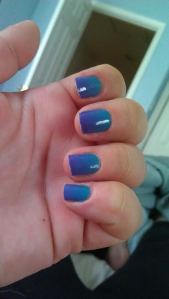

This was my first full manicure using Jamberry’s “Turple Ombre” and I loved the way it turned out! However, as I mentioned above, I did not use the baggie method the first time and had to take them off after 3 days due to lifting at the tips. Now that I know a better way to apply them to prevent this problem, I cant wait to try this design again! They are so pretty!

This is all it took to complete an ENTIRE manicure! You can easily get two or three manicures out of one sheet as well as two pedicures by cutting the large strips into pieces.

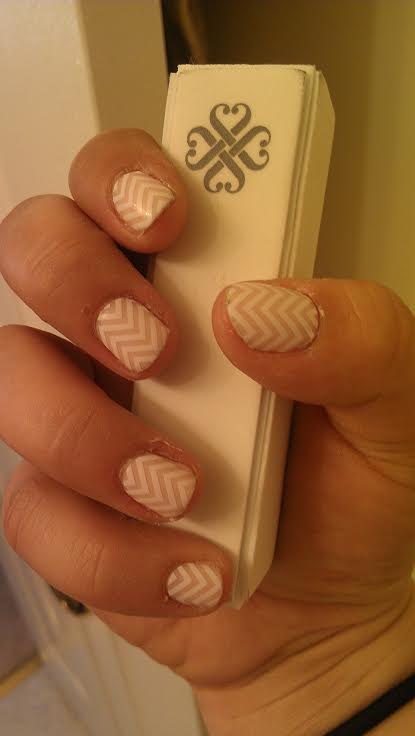
These were my nails painted with a regular nude pink polish before applying my White Chevron Jamberry wraps. Remember, they have a clear background so its fun to apply them over a colored polish. However, to ensure they have a nice base to adhere to, I used a nail buffer to gently buff away the shine on each nail before application.


I absolutely LOVE the way these turned out! I like the nude pink polish underneath as it will match everything and the white chevron pattern gives just enough of a contrast to make this manicure stand out from a traditional neutral look! Also, by using the baggie method, I could tell a difference IMMEDIATELY in the way these felt on my nails- so much smoother, more even, and better adhered than the first time. Also, I don’t have any lifting at the tips, even after 5 days and am confident that I can make these last at least a full week, or until I am ready for a new design!

^On Day 5^
_________________________________________________
OVERALL REVIEW
I have to say, I was a bit worried at first, but once I got the hang of application combined with using the baggie method, I can say that I do love Jamberry! I loved the concept and designs before I even tried them, was convinced to place an order after trying the samples I received, then fell in love once I saw how amazing these can look and how long they can last when applied right! As I write this review, the white chevron wraps I applied over a nude pink polish 5 DAYS AGO still look perfect and shiny, have minimal to no lifting at the tips, and have received numerous compliments!
I know it sounds like a bit of a pain in the ass to apply these things, and I am not going to lie, it is not as easy as painting your nails and probably takes twice the amount of time. However, to me, it is totally worth it when you want pretty nails that last almost 4 times as long as nail polish, or an intricate design that you can’t do on your own. In my opinion, even one week of a perfect manicure is worth the application process! Also, I am sure that it gets easier and faster each time, just like when you first started painting your own nails. I also love that they require no dry time, no top coat, and look like you had them professionally done. I think these would be perfect for vacation this summer so you don’t have to bring along nail polish and supplies!
Although I will always love nail polish (I have a HUGE collection) and love painting my nails, Jamberry is definitely something I will be integrating into my nail wardrobe since they come in such beautiful designs and look amazing! I personally will be using Jamberry nail wraps for several reasons including; just because I feel like it, for a special event or occasion, as accent nails with regular polish, or when I am going on vacation.
_________________________________________________

LETS PARTY!
If you are interested in getting a free sample of Jamberry nail wraps, playing games on Facebook for a chance at earning free prizes, and/or connecting with some awesome ladies while looking at super cute nail designs, then comment below!
I am hosting a virtual Jamberry Nails Facebook party starting next Wednesday May 28th!
All I need is your Facebook name in order to send you an exclusive invite. Accept the invitation to join, then, the consultant running the party, my blogger friend Ashly, will send you a sample wrap of your choice to try before the festivities begin!

^Available Samples^
I will begin sending invites this Friday, May 23rd (tomorrow) so be sure to let me know if you want in asap!


